
Managing caries and motivating change, part 2: Motivational interviewing
How do you motivate your patients? Discover how caries risk assessments and motivational interviewing tactics can help you connect with…


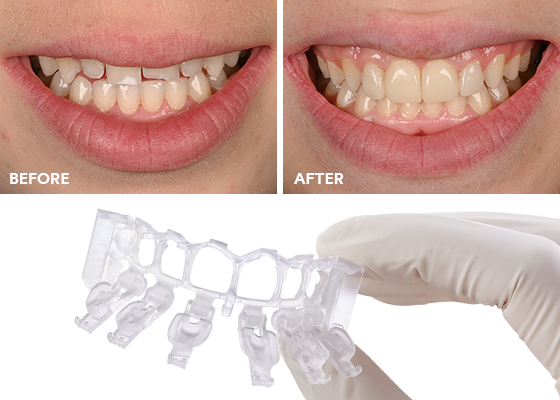
Achieving the correct shape is vital to a natural-looking anterior composite restoration. Learn how the 3M™ Filtek™ Matrix, paired with the right finishing and polishing technique, can help you achieve esthetic, natural-looking results patients want.
Anterior composite restorations help to preserve natural tooth structure with minimally invasive dentistry. However, they can be time consuming, somewhat unpredictable, and stressful to complete with freehand techniques. Thankfully, new tools and techniques have been developed to streamline the process and minimize freehand complexities – including the 3M™ Filtek™ Matrix.
The Filtek Matrix is a cost-effective and conservative solution designed to help dentists complete anterior composite restorations efficiently, predictably, and esthetically. As with any other composite restorative procedure, an effective finishing and polishing technique after placement is necessary to achieve the best possible outcome. In this article, we’ll take you step-by-step through Filtek Matrix use, focusing on the finishing and polishing technique so you can achieve smooth, uniform, natural-looking results.
While composite matrices aren’t a new concept, in the past they were limited to single-tooth restorations or small areas due to the complexity of freehand techniques. This is where newer systems, like the Filtek Matrix, come in.
The Filtek Matrix is a digitally designed, customized, patient-specific matrix system designed to simplify and streamline every step of direct composite restorative workflow, from diagnosis to design to final placement. For more details on the benefits of the Filtek Matrix, visit 3M.com/FiltekMatrix.
The Filtek Matrix Workflow:
1. The Filtek Matrix workflow begins with submitting a digital or traditional impression and a digital laboratory prescription form. 3M then creates a patient-specific smile design to be reviewed by the clinician for approval. Once the design is approved, the matrix is 3D printed and ready for use.
In the case featured in this blog, a young patient presented with small and chipped maxillary incisors. He did not feel confident to smile because he was self-conscious of his small anterior teeth (fig 1). The Filtek Matrix was selected as a minimally invasive solution that would achieve natural-looking, long-lasting results.

Figure 1: Pre-operative condition showing small and chipped anterior teeth. After cleaning the teeth a shade A1 was selected for this case.
2. From there, the matrix is tried-in for fit, then carefully removed to initiate the bonding procedure – which includes acid-etching, 3M™ Scotchbond™ Universal Plus Adhesive application, solvent evaporation and light curing. The matrix is then placed back in the mouth and clamped in place (fig 2).

Figure 2: a. Matrix try-in b. Etching c. 3M™ Scotchbond™ Universal Plus Adhesive application d. Matrix is clamped into place.
3. First, flowable composite is injected into the proximal areas and light cured to seal the matrix against the teeth. Composite is then injected to fill the remaining “windows” of the matrix, and the doors are closed, exerting enough pressure to create precise proximal contours (fig 3). The matrix comes with a guide to how much material you need in each window, enabling a better, easier, faster procedure.

Figure 3: a. 3M™ Filtek™ Supreme Flowable Restorative, shade A1 is injected into the matrix windows and light cured. b. 3M™ Filtek™ Supreme Ultra Universal Restorative (shade A1B) is injected into the matrix windows.
4. Any excess composite extruded through the facial vents is removed before light curing (fig 4). The clear, medical grade resin matrix allows for an easy, thorough cure from all directions.

Figure 4: a. Excess extruded composite is removed. b. The composite is light cured.
5. After curing, the doors are opened, clamps released, and the matrix removed (fig 5). Thanks to proprietary post-processing, the matrix does not bond to the composite for easy removal. However, the procedure doesn’t end here – the restoration must still be finished and polished to create esthetic, lifelike results.

Figure 5: a. Matrix doors are opened. b. Restoration after matrix removal.
As with any direct composite procedure, it is very important to contour and polish well to achieve natural results. The Filtek Matrix will take you through composite build-up and provide a better shape while minimizing voids compared to freehanding because you are filling rather than layering. Still, it’s up to you to successfully finish the restoration.
When contouring a restoration, created with the Filtek Matrix or otherwise, I utilize a “divide and conquer” approach. If you focus on each anatomical component of the restoration one by one, the sum of the parts will be an anatomical tooth. During each step, it’s important to only focus on the feature at hand and not be distracted by other features. The “divide and conquer” principle covers ten anatomical features, which you can explore in more detail in the article, “A systematic approach to contouring and polishing anterior resin composite restorations: A checklist manifesto.”1 While each area is important, the Filtek Matrix takes you further than traditional direct composite restorations anatomically, so you can save time on build-up before the final finish:
The length of the teeth:
Traditionally, you would determine length based on adjacent teeth along with the esthetic and functional parameters of the restoration and use abrasive discs, such as 3M™ Sof-Lex™ Contouring and Polishing Discs, to reach the proper length. However, with the Filtek Matrix, you don’t even have to think about this step – length is already incorporated into the design of the matrix – it may just need smoothing (fig 6).

Figure 6: Smoothing the incisal edge with a 3M™ Sof-Lex™ Finishing and Polishing Disc.
Incisal-facial line angle:
This anatomical feature is also provided by the matrix. The incisal-facial line angle should follow a natural arch form.
Facial profile/crest of contour:
A normal incisor contour has three planes: cervical, middle and incisal. Usually, the crest of contour (the greatest bulge of the tooth), is naturally positioned between the middle and gingival third of the teeth, and can be evaluated from an occlusal view. If necessary, it should be refined with a fine diamond bur or disc (fig 7).
This can be a challenging feature to obtain with the Filtek Matrix, due to excess material, but can be achieved with careful attention and practice – make sure to take advantage of 3M’s training kits with practice models to refine your technique.

Figure 7: a. A line is traced between the middle and gingival thirds of the restorations. b. A fine diamond bur is used to define and align the facial contours.
Line angles:
Line angles represent the transition between the buccal and lingual with the proximal surfaces; these lines can affect the visual perception of a tooth and should be carefully placed to ensure a natural appearance (fig 8). These angles are vital because they can optically change the appearance of a tooth. If the line angles are too far apart, the tooth will look wider; if they are too close together, the tooth will look narrower.2 The facial angle, in particular, can be challenging with the Filtek Matrix due to material excess – which is why it’s so important to remove as much excess as possible before removing the matrix.

Figure 8: a. The desired line angles are traced onto the restorations. b. The lines are refined with 3M™ Sof-Lex™ Finishing and Polishing Disc at speeds below 8000 RPM.
Embrasures:
Each embrasure – incisal, facial, gingival, and lingual – should be contoured with a disc to achieve the proper shape and size. Gingival embrasures are the hardest for practitioners to control and prevent excess, but the Filtek Matrix features a fin that helps prevent excess material in this area.
However, while embrasures are built into the Filtek Matrix, they may need an adjustment here and there to make sure they are smooth and excess-free. After using the Filtek Matrix, the embrasures may be joined, but it’s a smaller area to break through, and it’s much easier to separate the teeth. To break the contact, I like to use a serrated blade. It will cut the composite, separate it, but not remove it – then I can smooth the edges (fig 9).

Figure 9: a. A curved surgical blade (#12) is used to remove excess material in a shaving motion, not to cut the composite. b. A serrated blade is used to separate the teeth if there is bonding matrial between adjacent teeth. A diamond strip can be used to further smooth the interproximal areas if necessary.
Point angles:
Also built-up in the Filtek Matrix, point angles, or the junction of the line angle, embrasure, and incisal edge, should be a single point. Refinements can be made if necessary.
Axial inclination:
Every tooth is mesially inclined at varying degrees, which is particularly important when restoring multiple teeth. When working with the Filtek Matrix, this may need a bit of extra work, because of excess in the facial area. Look from the facial and make sure every tooth is mesially inclined, and the contralateral teeth match.
Depressions and elevation:
Adding depressions and elevations ensure a natural appearance that blends into the patients smile. Most anterior teeth have three elevations, corrresponding to the enamel mamelons, and two depressions, which I obtain by penciling over the facial surface, then using a fine-grit flame finishing diamond bur at about 10,000 RPM (fig 10).

Figure 10: A fine diamond bur is used to create depressions.
Surface texture:
While patients may want a smooth feel to their teeth, teeth themselves aren’t completely flat. Natural teeth feature perikymata and imbrication lines that cross the enamel surface and break light reflection. These textures can be achieved by using a fine grit diamond bur in a single direction, from mesial to distal.
Gloss:
A high final luster and gloss are critical to an esthetic restoration and can be achieved with wheels, discs, or abrasive cups in progressively decreasing grits. I like to start with a coarse grit cup and obtain my final polish with a very fine grit diamond-impregnated polisher. I think it gives you a surface indistinguishable from glazed ceramic (fig 11, 12)

Figure 11: a. A polishing cup is used to finish the restoration. b. Final results.
As demonstrated above, the Filtek Matrix includes many anatomical features in its design, enabling a faster and less labor-intensive build-up process without too much excess – which helps take clinicians a step further in the restorative process while minimizing freehand techniques. When working freehand, creating the exact shape you want, such as when trying to match the two central incisors, can be challenging and unpredictable. The Filtek Matrix reduces this risk by confining all material to its geometry. The bigger the case or the larger the build-up, the more help you get from the Matrix, such as with multiple composite veneers or diastemas. Both build-up and finishing can be challenging, but the Filtek Matrix reduces the time and challenge from buildup. You may have to spend more time finishing, but you are still saving time overall.

Figure 12: Initial situation and final results.
Anterior composite restorations are no laughing matter, particularly when attempted freehand. Thankfully, the Filtek Matrix helps take clinicians a step further by providing an excellent shape to start from. This head start, coupled with the right countouring and polishing technique, can help you achieve esthetic, natural-looking results in larger areas – and without the extra work.
SOURCES:
1. Vargas MA, Margeas R. A systematic approach to contouring and polishing anterior resin
composite restorations: A checklist manifesto. J Esthet Restor Dent. 2021 Jan;33(1):20-26. doi:
10.1111/jerd.12698. Epub 2020 Dec 25. PMID: 33368992.
2. Sesemann M. R. Understanding and providing appropriate line angles to optimize smile design
restorations. Journal of Cosmetic Dentistry . 2017;33(3):66–75)


How do you motivate your patients? Discover how caries risk assessments and motivational interviewing tactics can help you connect with…

Caries is a complicated multifactorial disease. In this two-part series, explore how caries risk assessments can help improve evaluation and…

Zirconia may be part of your everyday vocabulary, but how much do you know about this ceramic material? Learn more…