Managing caries and motivating change, part 2: Motivational interviewing
How do you motivate your patients? Discover how caries risk assessments and motivational interviewing tactics can help you connect with…


Posterior restorations call for strength but can also be optimized for both efficiency and esthetics. Learn how you can enhance your results by perfecting your composite placement technique – whether in increments or in bulk.
There is no single blueprint for posterior composite restorations. Efficiency, predictability, durability, esthetics – many factors come into play with each choice of material and technique. Many clinicians rely on standard incremental placement, which is well-practiced and well-known. But mastering one-step placement with bulk fill composites can also pave the way to new opportunities for your practice by improving efficiency without compromising the quality of dentistry your patients deserve.
Incremental composite placement is typically performed to reduce the effects of polymerization shrinkage stress or to improve esthetics. Sometimes, this means simply executing a “ramp fill,” where either the buccal or lingual prep wall is filled and light cured in increments. Alternatively, Class II restorations can be placed by restoring the proximal boxes and marginal ridges first, followed by ramp filling the occlusal areas.
Generally speaking, I prefer bulk filling and only place composite in increments when

Bulk filling has multiple advantages, including the potential for fewer voids and the reduction of time and complexity as compared to incremental composite placement. Older generations of bulk fill composites were not as esthetic because they required translucency to achieve a high depth of cure. And, they exhibited high polymerization shrinkage and associated stress. Modern bulk fills, however, allow placement of posterior composites in up to 5mm increments and offer a high degree of confidence in the materials’ depth of cure (using three-point curing) without an increased risk of post-operative sensitivity.
Flowables are particularly useful for deep class 1 or class 2 posterior restorations. A deep prep – often in the proximal box – can be lined with flowable and cured to enable you to meet the depth of cure requirements for your bulk fill composite, which in my case is 5mm. But that’s not the only time you can benefit from using a flowable composite.
In my practice, I utilize flowables on every posterior restoration. In part because it’s very difficult to get access to the proximal box with a capsule tip. And, injecting viscous restorative material directly from a capsule may limit composite adaption when irregular cavity shapes are present – particularly if the prep includes 90° angles. Irregularities and sharp angles have the potential to leave gaps and voids at the tooth restorative interface. A flowable enables you to fill micro-irregularities before incrementally layering to occlusion.
Most commonly, I use the “snowplow” technique, by placing a thin layer of flowable on the pulpal floor first – without curing – followed by placing bulk fill or universal composite over the top with pressure. This allows the flowable to fill in all the nooks, crannies and irregularities within the cavity preparation. While the two different restorative materials are placed one after another, it’s not actually considered layering or incremental placement, as both are cured simultaneously.

Patients today want healthy, natural-looking teeth – even beyond the anterior esthetic zone. As we strive to maximize esthetics in the posterior, it’s important to pay attention to detail. To this end, I use an opaquer every single time there is an amalgam tattoo or stained dentin present. First, because the grey color of an amalgam tattoo may look like secondary decay to you or another dentist and may result in the unnecessary replacement of the composite. Plus, patients are investing both time and money into their oral health, so it’s understandable that they don’t want to see discoloration under a newly placed composite.
In my practice, we use 3M™ Filtek™ Supreme Flowable Restorative shade AO3 or 3M™ FIltek™ Universal Restorative Pink Opaquer if we need to block underlying discoloration. It’s important to note that opaquers aren’t just for esthetics – this step helps eliminate future guesswork or rework due to discoloration. Opaquers also help to ensure that patients are satisfied with the esthetics of their new filling. For those reasons, I always block out any stains or dark tooth structure when placing posterior composites.

Some clinicians have a hard time adjusting to bulk fills because they’re used to building in occlusal anatomy during incremental placement. They assume that bulk filling will require them to cut back cured composite to sculpt proper anatomy. However, with modern materials, this isn’t the case.
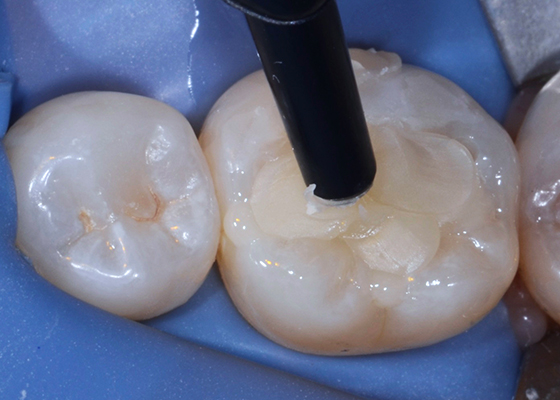
In my practice, we always try to sculpt the occlusal anatomy into our restorative material prior to light curing rather than cutting it back to occlusion with burs. 3M™ Filtek™ One Bulk Fill Restorative makes this possible – it’s a little softer than some universal restorative materials, but it’s not sticky, making it easy to carve and adapt. Most clinicians are well trained in carving anatomy using amalgam, and these skills can easily be transferred to bulk fills – enabling you to take advantage of the fact that there’s very little finishing required after placement, sculpting, and curing.
If you’re more comfortable with an incremental filling technique, I recommend placing a layer of flowable and teasing it around to fill any corners or irregularities in the preparation, making sure to cover the entire pulpal floor. After curing the flowable, place one increment of composite as a ramp on the buccal side and cure, then add and cure another ramp on the lingual side. Basically, you’re filling one side of the restoration first and then the other, avoiding placing increments that connect the cusps, and curing each increment as you go. Start from pulpal floor and work your way up, curing each side separately – never all at once. This helps mitigate polymerization shrinkage and “C Factor” stress, reduce post-operative sensitivity, and improve the adaptation of the restorative material to the tooth.

In order to achieve successful depth of cure, not only do you need to know and trust your materials, but you need confidence in your equipment and your technique. Many clinicians distrust bulk fills because they’re not sure that they will cure completely, so choose a material that you can trust. Filtek One Bulk Fill Restorative, for example, has a proven 5mm depth of cure when using a 3-position curing technique. However, the ability to achieve a complete cure often has less to do with the properties of the composite and everything to do with your curing light or technique.
Frankly, some clinicians have lights that simply aren’t of sufficient quality or intensity. If a composite isn’t completely cured it may discolor, wear prematurely and in some cases the patient may experience post-operative sensitivity. Many dental professionals either aren’t aware of their light’s inefficiencies or end up over-curing for peace of mind. That’s why it’s so important to regularly maintain and test your curing lights. It’s simple enough to check your equipment using systems like BlueLight CheckUp and CheckMARC – professional resources and testing equipment designed to help you keep your equipment working at its best. Most of all, regular testing can help you build trust in your light and confidence in your abilities, so you can become more comfortable with bulk filling.

If you haven’t implemented bulk fill materials yet, it’s a good place to start to improve your efficiency and reduce chair time. Utilizing universal adhesives is also a great addition to your posterior procedure because there aren’t any extra steps needed to control sensitivity – they’re great at penetrating and creating an excellent hybrid layer, thus sealing dentin, and resulting in very low post-operative sensitivity.
Etching has been shown to improve adhesive bond strengths, especially on enamel – and therefore, I always total etch unless we are close to the pulp. Plus, it’s often difficult not to etch the dentin when etching enamel margins. Start by placing etch on the enamel surfaces, then cover the dentin and wash after 5 seconds.
In the past, patients weren’t very concerned about the esthetics in the posterior teeth but attitudes have changed. Most of my patients want their entire smile, from front to back, to look and feel great. And while often overlooked, the final finishing and polishing steps of a posterior restoration are key to ensuring esthetic, long lasting results. In addition to improving luster and polish, finishing and polishing can actually help prevent staining and improve color stability.
Polishing requires a series of progressively finer grits. One way to think about polishing is that you are essentially scratching the surface, and you want to continue to remove the scratches sequentially until all scratches are gone – which will result in a silky-smooth surface luster that is resistant to stain and plaque retention.
I always recommend using diamond impregnated rubber tips, cups, discs or brushes, Medium and Fine. The 3M™ Sof-Lex™ Diamond Polishing System is great, as it’s a two-step process. For anterior restorations, we go one step further on anterior teeth and use a paste polisher with felt disc or small brush or rag wheel to get the luster needed. And of course, you need to make sure to use a material that compliments your procedure. In my experience, nanocomposites provide excellent handling, high strength, low wear, with great polish and polish retention. Because of their nano-sized filler particles, nanocomposites wear similarly to enamel and can help you achieve a natural, esthetic result.

The restorative techniques we’ve discussed come with both advantages and challenges. Incremental placement is a well-known and well-utilized technique but requires additional time to place and light cure the composite in stages. If you’re comfortable with one-step placement using bulk fills, you can take advantage of their time savings. And clinical studies have shown that bulk fill composites can reduce placement times without increasing post-operative sensitivity. Having said that, there will always be ways to optimize your procedure. Either technique, when combined with world-class dental materials and proven systems, can help you achieve long-lasting, esthetic results.

How do you motivate your patients? Discover how caries risk assessments and motivational interviewing tactics can help you connect with…

Caries is a complicated multifactorial disease. In this two-part series, explore how caries risk assessments can help improve evaluation and…

Zirconia may be part of your everyday vocabulary, but how much do you know about this ceramic material? Learn more…