
Managing caries and motivating change, part 2: Motivational interviewing
How do you motivate your patients? Discover how caries risk assessments and motivational interviewing tactics can help you connect with…


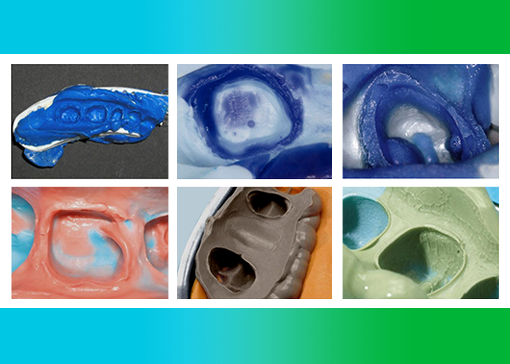
Accurate impressions for precisely fitting restorations: Effective measures shared by an experienced trainer help minimize risks in the impression procedure.
The process of taking precision impressions is riddled with potential errors. Errors in the process can compromise the quality of the impression, which in turn has a decisive impact on the fit of the final restoration. Therefore, it is important to know how to avoid them. Experience from more than 100 training courses in dental offices shows that everyone taking impressions tends to make the same mistakes and that these mistakes are usually easily avoidable. This article summarizes the most frequent errors that occur in the procedure and reveals proven strategies for success.
Potential sources of error
There are essentially four different areas where missteps might occur that could have a negative impact on the quality of the final impression:

Practice management: How to standardize
One of the most effective measures contributing decisively to a high quality and accuracy of the precision impression is standardization of the whole impression taking procedure. Within the practice team, tasks have to be allocated clearly, so that every single person knows exactly what to do. The ideal situation would be that every dental practitioner in an office uses the same materials and adheres to the same protocols, so that one dental assistant can substitute for another without errors stemming from process missteps.
When establishing standardized procedures, the team should not only define when to use which kind of materials and devices, but also focus on:
Material and tray selection: Recommendations
For accurate full arch impressions, the use of a rigid, non-perforated metal or plastic tray is highly recommended. Rigidity is important as it avoids inaccuracies caused by deformation. The tray size should be checked intraorally to ensure that uniform space (2 to 3 mm) is available around the teeth equator line (this takes undercuts into account). If a tray is too small, the risk is high that the impression will have defects and a limited reproduction of details.

Impression taken with a metal tray that is too small and an exceeded working time, which is responsible for a poor bond between the materials. Long flow defects are visible in the palatal area.
When selecting the impression material, different factors such as the compatibility between the material and the preferred technique need to be taken into account. Polyether is preferable for the monophase and 1-step techniques, while VPS is particularly well-suited for the 2-step technique and also works well with the 1-step technique. When choosing a VPS impression material, the user should select a product with good flow properties, plus hydrophilicity in the unset stage, which is not offered by every available product. The setting times should be selected based on the number of prepared teeth or implants to be captured.
Impressioning procedure: Tips and tricks
If you use an automatic mixing device, the impression taking procedure usually begins with automatic mixing and tray filling. Care needs to be taken with regard to:

Poor bond between tray and wash material, presumably caused by an exceeded working time.
Another important factor is the proper insertion of the loaded tray into the mouth. It needs to be moved slowly parallel to the long axis of the teeth before seating it straight up (maxilla) or straight down (mandible). Once the tray is in its final position with the handle aligned with the patient’s midline (assuming a full arch tray is being used), any movement needs to be avoided until the setting reaction is completed. Proper seating prevents distortions. It is useful to stabilize the tray in the premolar area with the fingers.
Some impression materials from 3M offer specific features that ensure a quick transition from the set to the unset state (such as self-warming of 3M™ Imprint™ 4 VPS Impression Material and snap setting of 3M™ Impregum™ Polyether Impression Material), which means less time for unintended movements. With regard to tray removal, releasing the vacuum with a finger aided by a stream of air is essential.

Measures facilitating removal of the impression from the mouth.

Follow-up measures: Doing it right
Any impression removed from the mouth should be rinsed with water, dried with air and disinfected with a mild solution before any other action is taken. Both, VPS and polyether impressions need to be stored in a cool, dry and dark place, and they should be shipped to the dental laboratory wrapped in dry paper towel and placed in an open bag if still moist. The dry paper will draw any moisture from the surface, leading to an optimal condition for transportation. Variations in temperature should be avoided.
Image: Precise impressions will lead to perfectly fitting restorations! (Images courtesy of Dr. Gunnar Reich)
Conclusion
The quality and accuracy of an impression has a huge impact on the quality and fit of the final restoration. Despite the complexity of the procedure, it is possible to ensure consistently accurate results with the effective measures described above. The key to success is standardization of the complete procedure, from tray filling to shipping of the final impression.
More information on how to avoid potential errors in the impressioning procedure is available here.

How do you motivate your patients? Discover how caries risk assessments and motivational interviewing tactics can help you connect with…

Caries is a complicated multifactorial disease. In this two-part series, explore how caries risk assessments can help improve evaluation and…

Zirconia may be part of your everyday vocabulary, but how much do you know about this ceramic material? Learn more…