
Clinical Case: Is it possible to do more with less? Cracking the chameleon effect
Using 3M™ Filtek™ Easy Match Universal Restorative.


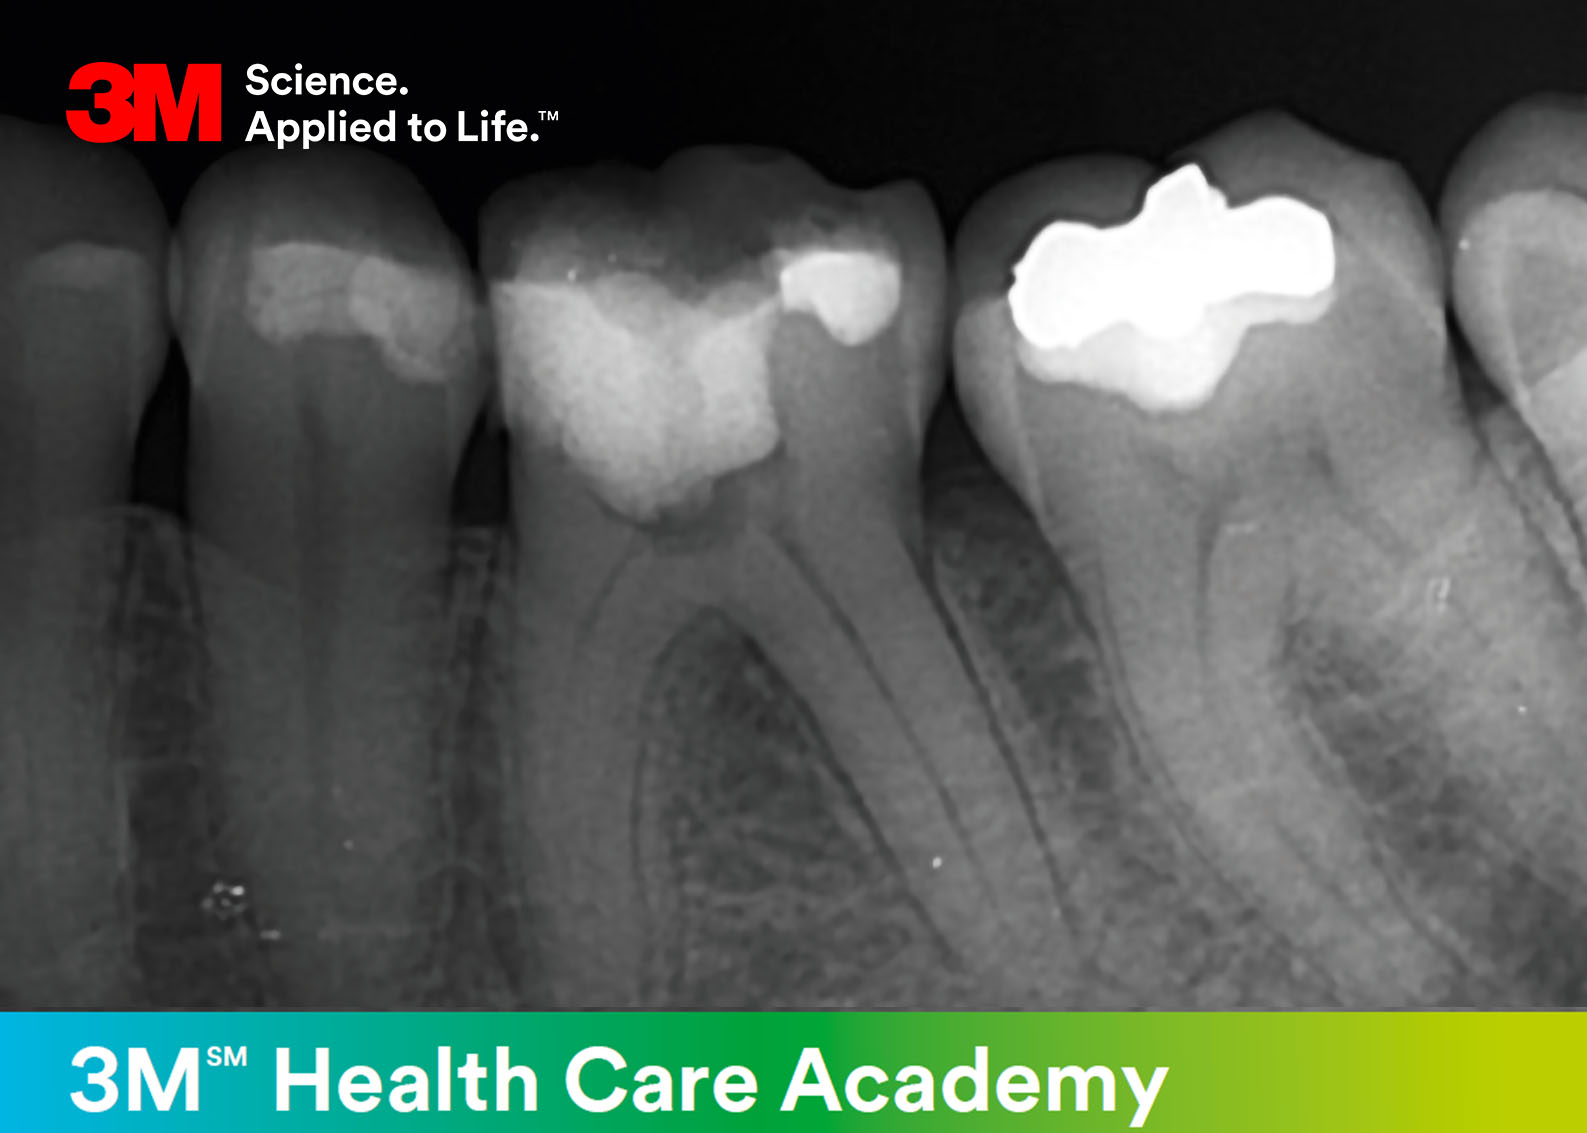
A 27 years old female patient came to the endodontic specialist practice for root canal treatment of lower left first molar, which was painful for few days. Initial x-ray revealed slight enlargement of periodontal ligament apically on mesial root of the lower left first molar and significant calcification of its root canals (Figure 1).
Clinical examination revealed acute inflammation of pulp of the molar. The access cavity was open and a coronal pulp stone was found at the entries of the root canals (Figure 2). Considering the tooth structure, mesial marginal ridge and complete mesial wall were lost, which would mean overall loss of approximately 40% of coronal tooth structure. Fortunately, the edge of mesial cavity was in enamel and still supragingivaly. The thickness of the remaining cavity walls was more than 3 mm. Based on the overall analysis, the treatment plan included direct reconstruction of the mesial cavity wall with composite resin material and, then, single-visit root canal treatment and direct composite resin coronal restauration in the second visit.
The mesial wall was reconstructed with a flowable composite resin (3M™ Filtek™ Supreme Flowable) and nano-based composite resin material (3M™ Filtek™ Universal Restorative). The 3M™ Filtek™ Supreme Flowable was used in very thin layer of approximately 1 mm to cover and close the gingival step of the restauration. The material has great adaptation to tooth structure without remaining bubbles and is very precise when being applied to such small deep regions. The 3M™ Filtek™ Universal Restorative was choosen for the restauration of the mesial wall due to it low shrinkage and low stress characterostics, which are considered as best option for large postendodontic restaurations. Also, its universal opacity and nanotechnology enables creation of highly aesthetic restaurations in posterior region that are, at same time, of high strength and resistance. These characteristics are very important for direct postendodontic restaurations.

Fig.1: Initial x-ray of lower left first molar

Fig.2: Access cavity of lower left first miolar: visible coronal pulp stone

Fig.3: Interdental sectional matrix with wedge placed mesially

Fig.4: Etching of enamel for 15 seconds with othophosphoric acid
After the rubber dam was placed, an interdental sectional matrix with wedge (Palodent V3 sectional matrix system, Dentsply Sirona) was placed around the mesial cavity of the tooth (Figure 3). Enamel was etched for 15 second (Figure 4) and then rinsed for 10 seconds with water. An universal adhesive system (3M™ Scotchbond™ Universal Plus Adhesive) was placed on the surface of the mesial cavity and rubbed for 20 seconds into enamel and dentin (Figure 5). After 10 seconds of its gentle air drying, it was polymerized for 20 seconds (Figure 6 and 7). Then, a thin layer (1 mm) of the 3M™ Filtek™ Supreme Flowable composite was applied on the gingival step at the border with the matrix, and, then, polymerized for 20 seconds (Figure 8 and 9). Specila attention was payed to the creation of correct contact point by withdrawing the matrix more mesially (Figure 9). The whole mesial wall was reconstructed with the 3M™ Filtek™ Universal Restorative composite material using thin layers of 2 mm with polymerization of 20 seconds each (Figure 10).

Fig.5: Placement and rubbing of the universal adhesive system (3M™ Scotchbond™ Universal Plus Adhesive)

Fig.6: Polymerizaction of the adhesive system for 20 seconds

Fig.7: The cavity after the placement of the adhesive system

Fig.8: Thin layer (1 mm) of flowable composite (3M™ Filtek™ Universal Restorative) is placed on the gingival step

Fig.9: Establishing proper mesial anatomic contour by pulling the matrx more mesially

Fig.10: Access cavity after the reconstruction of mesial surface
After the mesial wall was reconstructed (Figure 10), the coronal pulp stone was removed using a diamond-coated ultrasonic tip (CAVI, VDW.ULTRA®) (Figure 11). The access cavity was rinsed with 3% sodium hypochlorite (NaOCl) (Figure 12, 13). The working length was determined and glide path was performed by using ProGlider® (Dentsply Sirona) (Figure 14, 15). The root canal treatment was performed using reciprocating Wave One GOLD® Primary and Medium files (Dentsply Sirona) with copious irrigation with 3% sodium hypochlorite. (Figure 16-18). Root canals were filled and control x-ray was performed (Figure 19 and 20).
Considering the amount and the thickness of remaining coronal tooth structure, which makes up over 50%, it was decided to perform direct postendodontic restauration. Postendodontic restauration was built up with 3M™ Filtek™ One Bulk Fill, which was used as a dentine base, and 3M™ Filtek™ Universal Restorative for final restauration.

Fig.11: Removing of coronal pulp stone with an ultrasonic tip

Fig.12: Root canal irrigation with sodium hypochlorite

Fig.13: Access cavity after initial irrigation

Fig.14: Determination of the working length of root canals

Fig.15: Establishing the glide path of the root canals using ProGlider® instrument

Fig.16: Instrumentation of root canals using Wave One GOLD® instruments

Fig.17: Root canal irrigation with 3% sodium hypochlorite

Fig.18: Instrumentation of distal root canal with Wave One GOLD® file

Fig.19: Control x-ray after root canal filling

Fig.20: Filled root canals and access cavity ready for direct coronal restauration
In the next appointment, firstly, the enamel was etched for 15 seconds (Figure 21). An universal adhesive system (3M™ Scotchbond™ Universal Plus Adhesive) was placed on the cavity surface and rubbed for 20 seconds into enamel and dentin and polymerized (Figure 22 and 23). The entrance of the root canals and the whole floor of the access cavity was closed and covered with a flowable composite (3M™ Filtek™ Supreme Flowable) (Figure 24 and 25). In this way, the material enters slightly the canals and sealed them, and ,thus, protected from possible leakage in the future.
Then, the bulk composite material (3M™ Filtek™ One Bulk Fill) was used to reconstruct the dentine base (Figure 26 and 27). The material was polymerized for 30 second (10 seconds on wach side) (Figure 28). The 3M™ Filtek™ One Bulk Fill was used because it has twom innovative monomers (AFM and AUDMA) which provides both low polymerization stress and low polymerization shrinkage. These characteristics are very beneficial during reconstruction of big cavities after root canal treatment. Also, it speeds up the whole procedure because enables quick on-step placement of 4 mm, and has great adaptation ability.

Fig.21: Etching of enamel for 15 seconds with orthophosphoric

Fig.22: Application and rubbing of the universal adhesive system (3M™ Scotchbond™ Universal Plus Adhesive)

Fig.23: Polymerization of the adhesive system for 20 seconds

Fig.24: Application of flowable composite material (3M™ Filtek™ Supreme Flowable) on the bottom of the access cavity

Fig.25: The bottom of the access cavity is protected with thin layer of flowable composite material 3M™ Filtek™ Supreme Flowable)

Fig.26: Placement of bulk composite material in one step as a dentine base (3M™ Filtek™ One Bulk Fill)

Fig.27: Condensation of the bulk composite material (3M™ Filtek™ One Bulk Fill)

Fig.28: Polymerization of bulk composite material (3M™ Filtek™ One Bulk Fill)
The remaining restauration was built with highly esthetic nano-based and wear resistant composite material (3M™ Filtek™ Universal Restorative) (Figures 29-32). The occlusion was corrected and the whole restauration was finished and polished (Figures 33-37).

Fig.29: Placement of nano-based composite material in layers (3M™ Filtek™ Universal Restorative)

Fig.30: Shaping of the composite material

Fig.31: Final composite restauration

Fig.32: Final composite restauration

Fig.33: Occlusal correction of the restauration

Fig.34: Finishing of composite restaurations with diamond burs

Fig.35: Polishing of composite restauration with cups

Fig.36: Polishing of composite restauration with a brush and paste

Fig.37: Final composite restauration of lower left first molar
Refer to Instructions for Use (IFU) for complete product information. Results may vary.

Using 3M™ Filtek™ Easy Match Universal Restorative.
Using 3M™ Imprint™ 4 Light VPS Material, 3M™ Intra-oral Syringe, 3M™ Imprint™ 4 Heavy VPS Material, 3M™ Protemp™ 4 Temporization…
Using 3M™ Scotchbond™ Universal Etchant, 3M™ Scotchbond™ Universal Adhesive, 3M™ Elipar™ DeepCure-S LED Curing Light, 3M™ Filtek™ One Bulk Fill…