
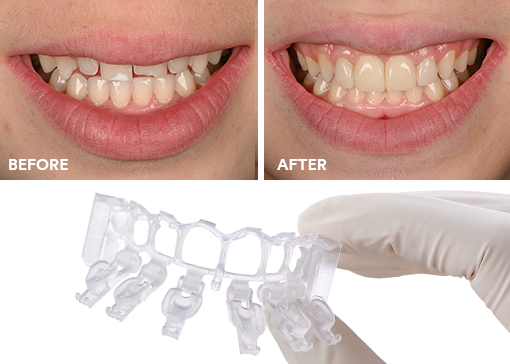
Contouring and Polishing Anterior Composite Restorations created with the 3M™ Filtek™ Matrix
Achieving the correct shape is vital to a natural-looking anterior composite restoration. Learn how the 3M™ Filtek™ Matrix, paired with…


Learn more about what to do – and what to avoid – when it comes to tooth preparation to ensure successful preps no matter which material you use.
Have a plan before you start, but also be flexible to the clinical reality in order to use the material that is best for the situation and the tooth. That’s the advice I would give to any dentist when thinking about the prep stage of crown and bridge work. It’s important to have a planned material in place that you are prepping prior to beginning any CEREC® restorations. In general, I approach most full coverage cases with the plan to utilize E-Max crowns.
The beautiful thing about CEREC is the flexibility of material choices that are available in real time after scanning and analyzing your prep. For example, the scan may show an inaccurate reduction, sharp or rough points that would stress a glass ceramic, or even a thin margin. If this happens, instead of having to go back and adjust the prep, it’s possible to change the material choice to zirconia. On the other hand, there have been times where I realized after scanning that I would be able to utilize lithium disilicate and have made the switch for esthetic reasons. Zirconia is a more forgiving material in terms of compressive stress and marginal adaptation. My advice is this: when in doubt after a scan, make the switch.
Some clinicians say they are going to use the same material no matter what, but that’s just not realistic. Granted, you can use the same material for a majority of your work but trying to force fit one material into every clinical situation is not possible.
Concurrently, it’s not possible to handle all your preps the same way either, especially if you’re using different materials. This is how a lot of failures happen. You might be able to under prep a zirconia or PFM restoration and get away with it (I’ve seen plenty), but you certainly can’t do that with a lithium disilicate or weaker material.
So, understanding tooth prep for different materials is important and you should have a protocol, or standard, in place for how you go through the prep process. Once I’ve determined the clinical situation, I can choose my material (important because of minimal thickness requirements) and work the process: proper occlusal and axial reduction, verify reduction and minimal thickness requirements, prepare the margin, proceed to pre-treatment. In the following article, I’ve noted some do’s and don’ts that I’ve identified in that process that should help you improve your own results.
Do: Use tools at your disposal to ensure appropriate reduction
Don’t: Eyeball it! You’ll under reduce.
Do: Verify your prep reduction
Don’t: Assume you’ve got the reduction you need, especially on the occlusal
Do: Understand the importance of minimum material thickness
Don’t: Ignore the material instructions
Do: Have an approach to margin prep you’re comfortable with
Don’t: Be afraid to use a different approach when clinically appropriate
Do: Make the prep nice and smooth with a diamond bur
Don’t: Underestimate how low you need to drop the speed down
Do: Be aware of how CAD/CAM processes affect your restoration
Don’t: Just grab the restoration and assume it’s clean and ready for bonding
Do: Follow the steps for pre-treatment from the instructions for use
Don’t: Treat all materials the same
The prep and pre-treatment phase of the restorative process can be tricky. An understanding of materials and their minimal thickness is critical, as is verifying your prep reduction. Thankfully, between tools and technology there’s really no excuse for a bad prep. Save the eyeballing for the green on 18, and instead use the tools that will bring out the best in your preps!
For the full whitepaper version, click here.

Achieving the correct shape is vital to a natural-looking anterior composite restoration. Learn how the 3M™ Filtek™ Matrix, paired with…
Direct composite restorative procedures can be challenging, particularly when it comes to esthetic cases. Discover how new techniques and tools…
When choosing a new universal adhesive for your office, you have a lot to consider – including clinical history. Take…