
Managing caries and motivating change, part 2: Motivational interviewing
How do you motivate your patients? Discover how caries risk assessments and motivational interviewing tactics can help you connect with…


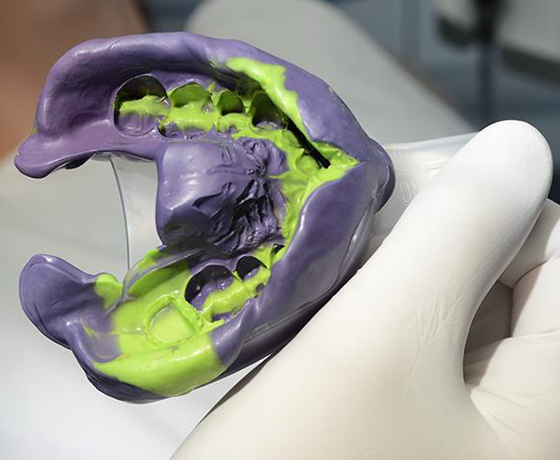
Let’s face it, impression disinfection can be difficult. Different materials require different standards, and it’s easy to miss crucial steps throughout the workflow. However, by taking the time to review your standards and streamline your workflow, you can set yourself up for consistent success – and best practices for safety.
Clinicians know how important disinfection, sterility, and infection control are to practice operations as well as the continued safety of staff and patients alike. However, it can be much easier said than done, particularly during the dental impression workflow.
Dental impressions can carry bacteria and viruses, but they can be difficult to disinfect because of their unique geometry, the properties of the materials used, and the number of people involved in the process. It’s important to keep in mind that disinfection and infection control should occur throughout the impressioning workflow, not just at the end. With that in mind, here are some “do’s and don’ts” to incorporate into your protocol and your practice.
DO: Make sure you have good hygienic standards in your office
Infection prevention has always been a critical part of dentistry, but now more than ever, these processes are on the forefront of everyone’s mind. While you may have already upgraded the hygiene standards in your office, it’s a good idea to regularly review, revise and update practices as needed. This helps you stay up to date with guidelines and ensures everyone on staff knows and adheres to the same expectations.
DON’T: Don’t forget to train and regularly refresh all team members on disinfection protocols and utilize checklists
Within the operatory and throughout your practice, staff need to know how to properly disinfect surfaces, equipment, and impressions, how often to change the disinfectant solution and the importance of these efforts. Team members should be thoroughly trained in these protocols as soon as they join the team – and receive updates throughout their employment. This is where training check-ins, refreshers and checklists can come in handy. Otherwise, certain steps risk being forgotten on busy days. Not only disinfection of impressions, but the whole infection control process should have quality management and should be checked on a regular basis.
DO: Rinse the patient’s mouth before the impression procedure
A preprocedural mouth rinse can be used before any dental procedure to reduce intraoral salivary bacteria. Not only does this remove any materials that could prevent the impression material from setting, but it may also help minimize the microbial load before air-drying, reducing the risk of contamination from aerosols and splatter, as well as the overall bioburden before disinfection. 1-3
DO: Utilize single-use retraction and moisture management solutions
Good retraction is a vital step in any impressioning procedure as it ensures all areas of the preparation are accessible, visible, free of contamination, and provides a dry operating field. This not only helps achieve more accurate results but, depending on the method used, can also help with overall infection prevention and disinfection later in the procedure.
Retraction Cord:
This technique makes use of a cord (or cords), pre-soaked or impregnated, that is placed around the preparation with the help of metal instruments to displace gingival tissue. While effective on thick gingival tissue and margins below the gingiva, there are several elements of this technique that make it difficult to keep clean.
The metal instruments used for placement are semi-critical objects (they don’t penetrate soft tissue, but still pose a high infection risk) and need to be properly sterilized and reprocessed between uses. While easy to overlook, the cord container also needs to be cleaned and disinfected – otherwise anything on the surface could contaminate the procedure. And in the event you need different cord sizes – reach for one, try it out, need to grab another – you open yourself up for more cross-contamination.
Retraction paste:
Retraction paste utilizes aluminum chloride to help stop bleeding and is syringed around the preparation into the sulcus. While there are multi-use options available, including 3M™ Astringent Retraction Paste, most retraction pastes come in single-use compules, so there’s no need for reprocessing – eliminating a step and risk of cross-contamination.
DON’T: Don’t move forward if there’s too much inflammation or you can’t stop bleeding
While it can be tempting to push forward with an impression – your and your patients’ time are precious – it’s not worth the risk of potential inaccuracies or contamination.
Disinfecting the final impression can be difficult and even after rinsing, there’s still the risk of blood or other contamination travelling to the lab. By making every effort to ensure cleanliness earlier in the procedure, you can reduce the risk of contamination. Overall, it’s better to release the patient and ask the patient to come back in 1-2 weeks. This allows inflammation and prep trauma die down, so you can ensure a safe, accurate impression.
DO: Use disinfected/sterilized or single-use trays
Any multi-use trays should be properly disinfected or sterilized before use, but single-use options will always be a more hygienic choice. For example, single-use impression trays, such as 3M™ Impression Trays, don’t require any reprocessing, so there’s no opportunity for cross-contamination. There’s also no need to clean off any residual material, and the lab tech can simply throw the tray away when they’re done. Compare this to metal, multi-use trays. When you get them back from the lab, you must remove the impression, clean off any excess material, and follow sterilization and cleaning procedures – which can be very time consuming and expensive.
DO: Consider using automix delivery systems over hand mixing
It goes without saying that dispensing tray material from an auto-mix dispenser, such as 3M™ Pentamix™ 3 Automatic Mixing Unit or 3M™ Pentamix™ Lite Mixing Unit, is more hygienic than scooping from a multi-use jar and mixing by hand. Doctors who are still hand mixing should take a hard look at their procedure and consider using automix delivery to reduce the risk of cross contamination.
Hand mixing:
While inexpensive, hand mixing requires dental personnel to measure out the right ratio of two pastes to achieve optimal material properties. However, this process can be difficult to keep clean. The material is scooped from two separate containers, which can be messy, and while gloves will keep your hands clean, they’re not always sterile. This means that if you touch any materials or instruments with them, you run the risk of causing cross-contamination or affecting the material.
Automix:
Automixing is inherently faster and cleaner. It provides a consistent, homogenous mix of materials in exactly the amount needed, without any of the mess. Plus, there are more material options with different viscosities available.
However, it’s important to keep in mind that delivery systems require their own cleaning and disinfection protocols. While at the lowest infection risk as a non-critical object, they still must be cleaned and disinfected after every patient, so make sure to review best practices.

DO: Rinse the impression before disinfecting
There’s no point in disinfecting dirt. More important, a soiled surface cannot be properly disinfected. Any impression you take will likely be contaminated with saliva and/or blood, and you don’t want to put it into the disinfection solution/bath while it is still soiled. Immediately after removal from patient’s mouth, soak the impression in water or put it under a running tap briefly to rinse and wash off visible debris before placing in disinfectant.
DON’T: Don’t rush through disinfection
There are many different techniques and chemical solutions for disinfection, each with their own advantages and disadvantages. Whichever option you use must effectively disinfect the impression without altering the dimensions and surface details of the impression and resultant cast.
With this in mind, be patient and take the time to do the disinfection properly. Check the IFU for the impressioning material and the disinfection solution: How long should you leave it? The disinfectant might be aggressive, so check to make sure you are using a disinfectant indicated for your material.

DO: Disinfect all surfaces/counter tops
All surfaces should be disinfected at least once a day at the end of work – and immediately if there is visible contamination. Just make sure to wipe them down with a disinfectant for surfaces with a short exposure time.
DO: Ensure impression is stored and shipped correctly
Different materials require different storage conditions – whether cool, dry, or wrapped in a specific material. It’s critical to pay attention to best practices for each material, as they can affect the quality of the final impression.
Some materials, especially alginate impression materials used for provisional/temporary impressions, can actually distort if stored incorrectly. These materials have high water uptake and will swell if stored in water but will lose water and shrink if stored exposed to air. To avoid this possible dimensional distortion and ensure accurate results, the model should be poured immediately after the impression is cleaned and disinfected. If the model can’t be poured immediately, these moisture-sensitive impressions should be stored in a sealed plastic bag in 100% relative humidity at room temperature to retain moisture. Alternatively, the impression can be wrapped in a damp, but not wet, paper towel and placed in a plastic bag.4,5
3M impressioning materials, polyether and vinyl polysiloxane (VPS), on the other hand, should be kept in a dry environment wrapped in paper rather than plastic. When sending to the lab, impressions should be wrapped in paper towel, then placed in a foil bag or package separately. Do not mix different materials inside a bag. Some are hydrophilic and others are hydrophobic, and if you put them together, they can negatively affect each other.
DO: Communicate effectively with the lab
When the impression arrives at the lab, there is often no way for the technician to know how – or even if – it was disinfected. There needs to be a high level of communication and trust between dentists, lab technicians, and even the delivery person. Labs often serve multiple dental offices, so an assistant may do all the pickups and drop-offs.
On the other end of the workflow, the dental technician wants to be confident that they can touch the impression – not all lab techs wear gloves. It’s not pleasant or safe to handle soiled or contaminated impressions. While practices should disinfect impressions before sending them to the lab, the laboratory cannot take this for granted, and should have its own measures to clean and disinfect materials. Likewise, practices should not assume that the lab has performed all necessary disinfection after manually handling the impressions. For every touchpoint, it’s better to do extra cleaning than not enough. With this in mind, it’s critical to keep the lines of communication open with the lab and properly record disinfection practices.
When it comes to impressioning, infection control is never as simple as “one and done.” But by reviewing and following proper protocol for disinfection throughout the workflow, you can improve efficiency, maintain impression accuracy, and ensure a safer process for your staff, your patients and your laboratory partners.
1. Centers for Disease Control and Prevention. (2020a, February 11). Coronavirus Disease 2019 (COVID-19): Guidance for Dental Settings. CDC.
2. American Dental Association. (2020, March 12). ADA adds frequently asked questions from dentists to coronavirus resources. ADA.
3. Peng, X., Xu, X., Li, Y. et al. Transmission routes of 2019-nCoV and controls in dental practice. Int J Oral Sci 12, 9 (2020).
4. Nandini, V Vidyashree, et al. “Alginate Impressions: A Practical Perspective.” Journal of Conservative Dentistry : JCD, Medknow Publications, Jan. 2008, https://www.ncbi.nlm.nih.gov/pmc/articles/PMC2813082/.
5. Rohanian, Ahmad, et al. “Effect of Storage Time of Extended-Pour and Conventional Alginate Impressions on Dimensional Accuracy of Casts.” Journal of Dentistry (Tehran, Iran), Tehran University of Medical Sciences, Nov. 2014, https://www.ncbi.nlm.nih.gov/pmc/articles/PMC4281187/.

How do you motivate your patients? Discover how caries risk assessments and motivational interviewing tactics can help you connect with…

Caries is a complicated multifactorial disease. In this two-part series, explore how caries risk assessments can help improve evaluation and…

Zirconia may be part of your everyday vocabulary, but how much do you know about this ceramic material? Learn more…